¶ Deploy our application on your Azure tenant
This documentation will describe how to deploy the Open Lake suite on your tenant.
¶ Overview of the applications
Our service is using Azure Container App to manage our application:

¶ Ressource group
The first step is the creation of a ressource group. It is a logical container used to organize and manage related Azure resources. Resource Groups help you manage and organize resources in a way that makes it easier to deploy, monitor, and maintain them as a group.
A Resource Group is essentially a logical container that holds related Azure resources. These resources can be virtual machines, databases, storage accounts, web apps, virtual networks, and more.
It allows you to manage and organize these resources as a single unit. For example, you can start, stop, delete, or update all the resources in a group simultaneously.
Resource Group Scope: Resource Groups are confined to a specific Azure subscription. Resources from different subscriptions cannot be grouped together in the same Resource Group.
Access Control: Azure Resource Groups allow you to define role-based access control (RBAC) to control who can perform actions on the resources within the group.
¶ Azure Container Apps
Azure Container Apps is a fully managed environment that enables you to run microservices and containerized applications on a serverless platform.
Applications built on Azure Container Apps can dynamically scale based on the following characteristics:
- HTTP traffic
- Event-driven processing
- CPU or memory load
¶ Azure Container Environment
A Container Apps environment is a secure boundary around one or more container apps and jobs. The Container Apps runtime manages each environment by handling OS upgrades, scale operations, failover procedures, and resource balancing.
The container app is managing our dashboards. We use a consumption plan type, 8 million requests per month maximum, 20 simultaneous requests per container application, 100 milliseconds of execution per request, 2 virtual processors, 2 Gigabytes of memory for the container. The costs is around 2.2686€ per month for France Central deployment.
¶ Azure Key Vault
Azure Key Vault is a cloud service for securely storing and accessing secrets. A secret is anything that you want to tightly control access to, such as API keys, passwords, certificates, or cryptographic keys. Vaults support storing software and HSM-backed keys, secrets, and certificates.
The vault if certified for PS 140-2 level 2 and level 3.
We use the Azure safe to store our keys and sensible variables. The costs is around 0.028€ per month for France Central deployment to store 50 secrets & variables.
¶ Azure Load Balancer
The Azure Load Balancer will connect the applications to internet and also act as a reverse proxy to access the application from internet ensuring the communication to be ciphered with SSL/TLS.
¶ Azure Function App
Azure Function is a serverless compute service that enables user to run event-triggered code without having to provision or manage infrastructure.
Azure functions are used to get the vairous reporting, get the users list, get the call queue details, get the recordings, get the Teams Call Details Record. We do our polling every 5 minutes and we use a maximum of 1GB of memory and around 100 millisecondes of execution duration (It's around 8 640 executions per month).
The cost is 0 if we execute less than 1 million times.
¶ Elasticsearch
This noSQL database is used to store the application data. The service is deployed into the ressource group & your tenant. All the data in transit à ciphered using SSL/TLS, data at rest à ciphered at OS level and the authentication is done using API key.
We use Elasticsearch as a database, you can deploy it with various configurations (Depending on storage, CPU & RAM and redundancy level desired).
For a fully managed elasticsearch with 35GB of storage with a dual zone redundancy cluster in France Central, the costs is around 130€ per month. Recommended for less than 500 end users.
For a fully managed elasticsearch with 70GB of storage with a dual zone redundancy cluster in France Central, the costs is around 216€ per month. Recommended for 500 to 1000 end users.
For a fully managed elasticsearch with 140GB of storage with a dual zone redundancy cluster in France Central, the costs is around 388€ per month. Recommended more than 1000 end users.
¶ Security
We make a priority of designing our Azure Container Apps to rigorously follow Microsoft's security best practices. Our team of security experts works closely with our developers to ensure that every aspect of our application is protected, from the underlying infrastructure to sensitive data. Through ongoing risk assessments, penetration testing and constant vigilance, we strive to offer our users a reliable and secure environment, while meeting the highest standards for cloud container security. In particular, we use:
- Azure Container App reverse proxy (with automatic SSL certificate)
- SAML OAUTH2 authentication (This mechanism ensures that identity and identification is assured by your tenant, in compliance with your password policy, two-factor authentication, user deactivation, etc.),
- Data is segregated and secured in a dedicated Azure Resource Group,
- Our applications are compatible with Defender and the monitoring suite (Alerts, Metrics, Logs...).
- Please note that our installation service will generate several random passwords stored in the Azure Key Vault, which our teams have no knowledge of or access to (e.g. database password, secret application...).
¶ Azure consuptions & billing
We build our services to ensure the various modules consume only the minimum of Azure resources. We rely on pay-as-you-use principles to ensure no billable consumptions if one service is not active or on pause (for example during the night). Notice that our services are compatible with the billing tools of Azure allowing you to dive deep into the consumptions of each module.
This list summarize the costs estimation to run our service on your tenant:
¶ Notes
These costs are obtains using the online Azure costs calculator. We can share real example using our Azure Billing Monitor to get a more details view.
¶ Prequisites
In order to collect all the date, a few steps are needed to connect ou app to your tenant.
¶ Application registration
Navigate to: https://portal.azure.com with your Microsoft account.
- Search “App registration”
- Create “New App”.
In the creation screen, you can select "Accounts in any organization directory" and set a name for this application.

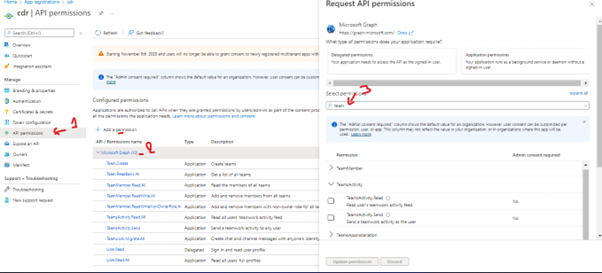
¶ Add the permissions
You need to add the following permissions:
- Permission type : Application
- User.Read.All
- Reports.Read.All
- CallRecord-PstnCalls.Read.All
- CallRecords.Read.All
- Chat.ReadBasic.All
- Chat.Read.All
- AppCatalog.Read.All
- Channel.ReadBasic.all
- ChannelMeber.Read.all
- Directory.Read.all
- Groupe.Read.All
- TeamsSettings.Read.all
¶ Generate the application Secret Key
The Secret Key value will be hidden just after it is generated, so copy it and save it in a notepad or other tool.
The secret key is available in the "Certificates & secrets" menu:

¶ Summary
At the end of the various operations, you have:
- Application ID
- Tenant ID
- Application's secret key

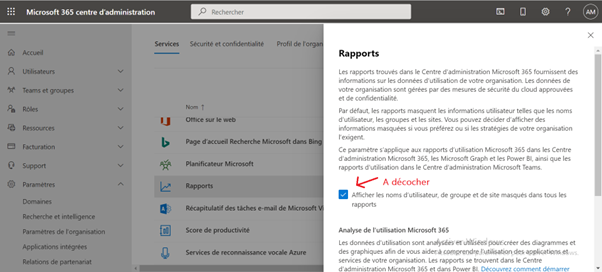
¶ Allow to display ids in activity reports
By default, in activity reports. The user-friendly name of each user is hidden. To obtain the user-friendly name, perform the following operation:
In Microsoft 365 admin center.
- Settings > Org Settings > Services > Reports.

- Untick “Display user names”
¶ Queue-level authorization
To be able to obtain queue information, you need to add the application to the "Teams Communication Administrator" role.
Go to Microsoft Entra Id (the new Azure Active Directory), then to "All Roles". In this menu, you can find the "Teams Communication Administrator" role and add the application to it:

¶ Application registration
This document explains how to activate SSO on our dashboard.
SSO (Single Sign On) allows you to authenticate on our dashboard using your Microsoft Professional account login and password.
¶ App registration creation
Log in to Azure Portal, then click on Azure Active Directory in the side menu.
If you have access to more than one tenant, select your account in the top right-hand corner. Set up your session on the Azure AD tenant you wish to use.
Under Manage in the side menu, click on "Application registrations > New registration", then enter a descriptive name.
Under "Redirect URI", select the type of Web application.
Add the following URL redirection : https://nom-de-domaine-du-tableau-de-bord/login/azuread & https://nom-de-domaine-du-tableau-de-bord then click on Register. The application overview page opens.
Le nom-de-domaine-du-tableau-de-bord is the URL to access your dashboard in your domain.
Note the application ID. This is the OAuth client ID..
Click Endpoints in the top menu.
Note the URL of the OAuth 2.0 (v2) authorization endpoint. This is the authorization URL.
Note the OAuth 2.0 (v2) token endpoint. This is the token URL.
Click on Certificates and secrets, then add a new entry under Customer secrets with the following configuration.
Description : OLT OAuth
Expire : Never
Click on Add and copy the key value. This is the OAuth client secret.
Click on Manifest, then define the application role values required for the dashboard: Viewer, Editor, or Admin. If not defined, all users will have the Viewer role. Each role requires a unique identifier, which you can generate under Linux with uuidgen, and under Windows via Microsoft PowerShell with New-Guid.
Incluez l'ID unique dans le fichier de configuration :
"appRoles": [
{
"allowedMemberTypes": [
"User"
],
"description": "OLT admin Users",
"displayName": "OLT Org Admin",
"id": "SOME_UNIQUE_ID",
"isEnabled": true,
"lang": null,
"origin": "Application",
"value": "Admin"
},
{
"allowedMemberTypes": [
"User"
],
"description": "OLT read only Users",
"displayName": "OLT Viewer",
"id": "SOME_UNIQUE_ID",
"isEnabled": true,
"lang": null,
"origin": "Application",
"value": "Viewer"
},
{
"allowedMemberTypes": [
"User"
],
"description": "OLT Editor Users",
"displayName": "OLT Editor",
"id": "SOME_UNIQUE_ID",
"isEnabled": true,
"lang": null,
"origin": "Application",
"value": "Editor"
}
],
Go to Azure Active Directory, then Enterprise Applications. Find your application and click on it.
Click on Users and Groups and add users/groups to OLT roles using Add User.
¶ Information to provide
Once these steps have been completed, you can send us :
- Application ID
- Application Secret
- Your tenant ID
¶ Generate a random UID
You can directly use a Powershell window and enter the following command:
PS C:\Users\antoi> New-Guid
guid
2ec396eb-56cc-4c61-a88b-4945da61c44b
¶ Users group creation
To facilitate the users administration, we rely on AD groups. You can directly set who you want to monitor by adding the end user to the group you need.
We need three users groups:
SVC_OLT_ADOPTION: This is the group of the users monitored by the adoption dashboard
SVC_OLT_COMPLIANCE: This is the group of the users monitored by the compliance dashboard
SVC_OLT_MONITORING: This is the group of the users monitored by the ITOI dashboard
¶ Prequisites summary
At the end of the prerequisites steps, you should have the following information:
For the data collection:
- Tenant ID
- Application ID
- Application Secret
- All the authorization validated and the call queue user role
For the authentication:
- Tenant ID
- Application ID
- Application Secret
- The dashboard URL added into the SAML redirection
For the user administration:
- A user group for Adoption
- A user group for Compliance
- A user group for Monitoring
¶ Installation steps
¶ Prepare Powershell
Set the PowerShell execution policy to remote signed:
Set-ExecutionPolicy -ExecutionPolicy RemoteSigned -Scope CurrentUser
Use the Install-Module cmdlet to install the Az PowerShell module:
Install-Module -Name Az -Repository PSGallery -Force
Sign in interactively with the Connect-AzAccount cmdlet:
Connect-AzAccount
¶ Creation of the Ressource group
Create the ressource group "OpenLake":
New-AzResourceGroup -Name OpenLake -Location "South Central US"
Specifies the location of the resource group. Specify an Azure data center location, such as West US or Southeast Asia. You can place a resource group in any location. The resource group does not have to be in the same location your Azure subscription or in the same location as its resources
¶ Deployment of the Elasticsearch database
¶ Deploy the managed Elasticsearch
Elasticsearch is not yet deployable via automated script because it's a managed service.
You can login on you Azure interface and search for Elasticsearch.
Then you can use "create":
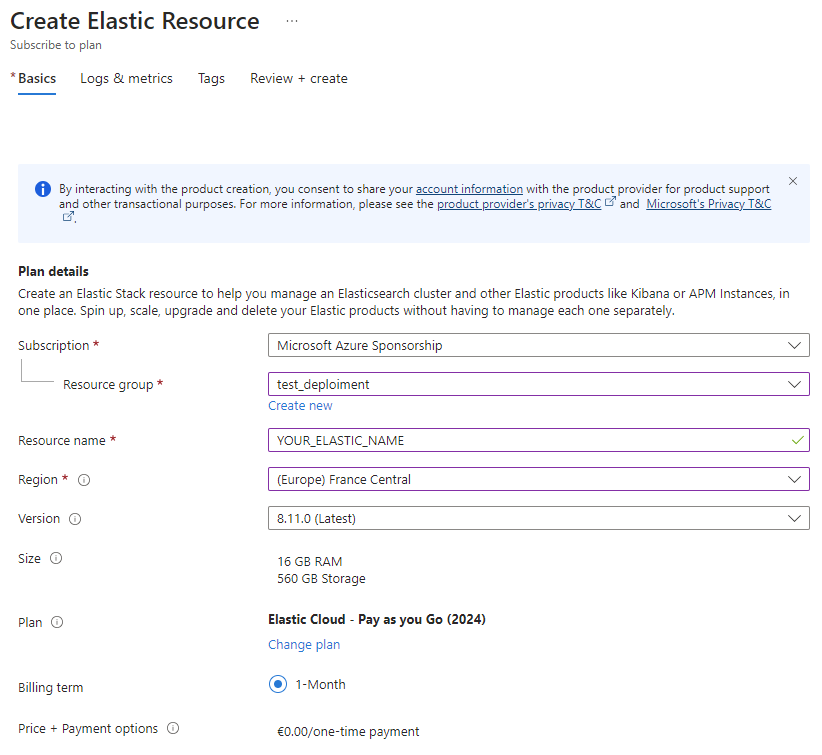
You can select the ressource group created earlier and you can set the name & location.
Notice the defaut size is not editable, we can change it later.
You can click "Review + create"
¶ Select the hardware configuration
Once deploy, you can modulate the Elasticsearch configuration by clicking "Configuration". You can see here the configuration is set for 2GB or RAM & 70GB of storage
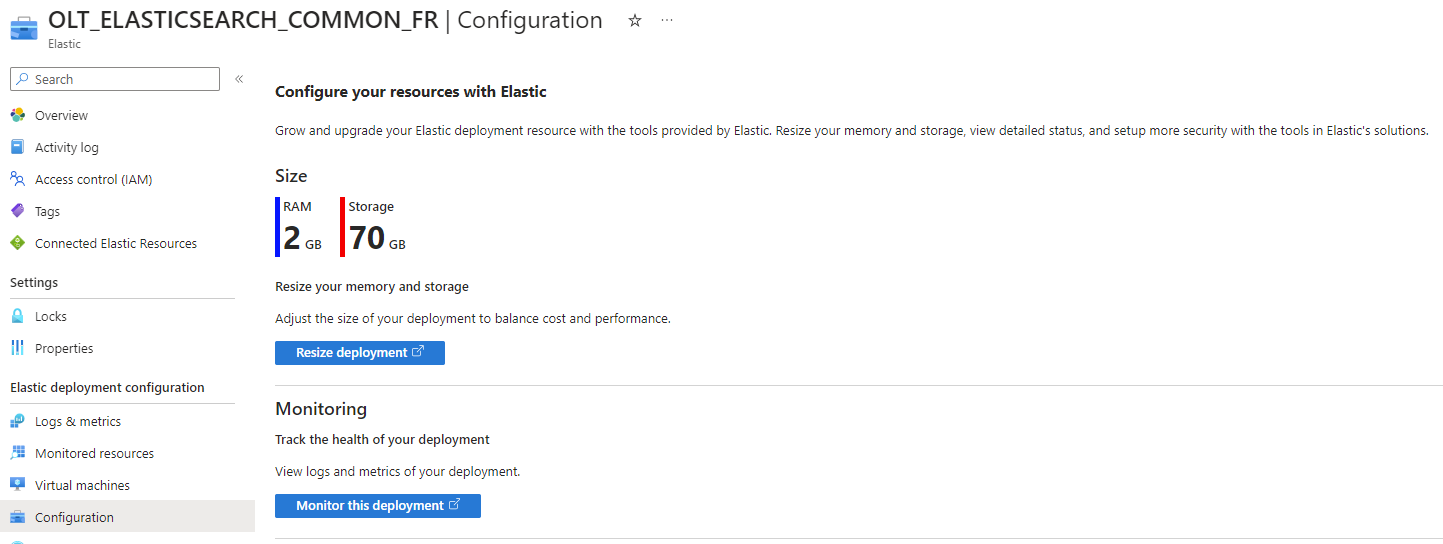
When you click on resize deployment, a new page is open with all the configuration available:

On the top of the page, you can directly select the size, the recommanded size is 35GB of storage, 1G of RAM & 2.1 vCPU. If not suitable, you can change it after anyway. Notice you can also add redundancy via "availability zones".
You can disable all the other options (Integration, enterprise search...).
At the end, you'll find a costs estimate on the right, and you can save to confirm the configuration.
¶ Generate the API Key
To allow the app to publish & retrieve data, we need an API access.
You can navigate to https://cloud.elastic.co/home and click authentication with Microsoft.
You can click on your deployment, and navigate on the left to "Stack Management" and "API KEYS".
You can click on "Create API Key", give a name and tick "Restrict Privileges"
A popup is open with the API key:

¶ Information to keep
You can note somewhere the API key and the URL of you elasticsearch instance like "https://olt-elasticsearch-common-fr.kb.francecentral.azure.elastic-cloud.com:9243/" as we'll use it later.
¶ Deployment of the service
You can directly execute the file installation.git via the following command:
New-AzResourceGroup -Name OpenLake -Location "South Central US"